Moa Shooting Chart - Moa Mils And Math The Long Range Shooting Guide Part 2

Moa Mils And Math The Long Range Shooting Guide Part 2

What Is Moa We Help You Understand Minutes Of Angle For .

How To Calculate The Minute Adjustments Required To Make On .

Pin On Scope Settings .

Long Range Shooting Moa And Mils Explained .

Moa Master Target Ranging Chart Free Download Gun Warrior .

Moa Vs Mrad .

What Is Moa We Help You Understand Minutes Of Angle For .

How To Understand Minute Of Angle Moa Long Range .

Details About Moa Minute Of Angle Laminated Chart For Rifle Pistol Target Shooting .

What Is Moa We Help You Understand Minutes Of Angle For .

Moa Mil Conversion Chart Chart How To Plan References Page .

Mils Vs Moa Which Is The Best Long Range Language Gun .

How To Understand Minute Of Angle Moa Long Range .

Mils Vs Minutes Of Angle The Complete Guide Everyday Marksman .

Mils Vs Minutes Of Angle The Complete Guide Everyday Marksman .

Mil Moa Conversion Chart .

Pin On Armas .

308 Ballistics Charts Point Blank Range Hunting Loads .

What Is Moa We Help You Understand Minutes Of Angle For .

Details About Moa Minute Of Angle Laminated Chart For Rifle Pistol Target Shooting .

Moa For Dummies Rifle Scope Reviews Gun Mart .

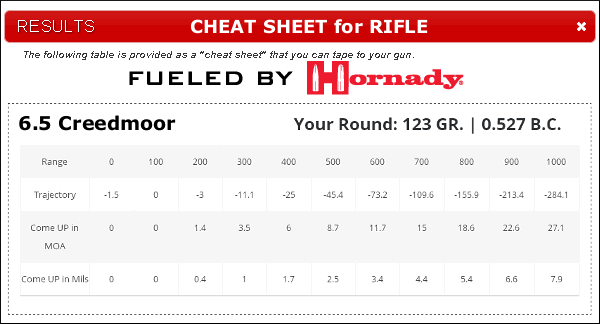
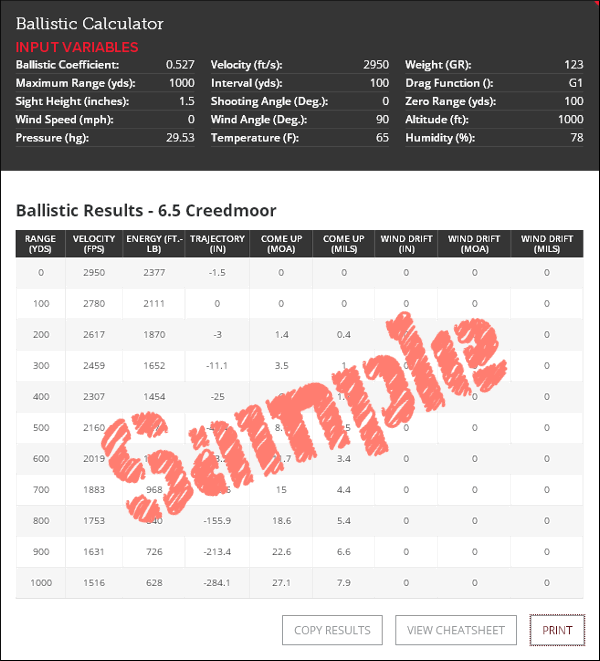
Print Handy Drop Chart With Free Hornady Ballistics .

Wind And Dope Charts And Getting Boned By Assumptions .

Ballistic Table Wikipedia .

Practical Long Range Rifle Shooting Part Ii Optics .

Long Range Shooting Moa And Mils Explained .

Pin On Rifle Dope .

Ballistic Table Wikipedia .

Mils Vs Moa Which Is The Best Long Range Language Gun .

Mil Vs Moa Understanding The Difference In Scope Measurements .

How To Read A Ballistics Chart .

Shooterscalculator Com 22 Lr High Velocity .

17 Studious Moa Bullet Drop Chart .
Moa Mils And Math The Long Range Shooting Guide Part 2 .

Millett Shooting Tips .

Understanding Minute Of Angle Moa Long Range Shooting Technique .

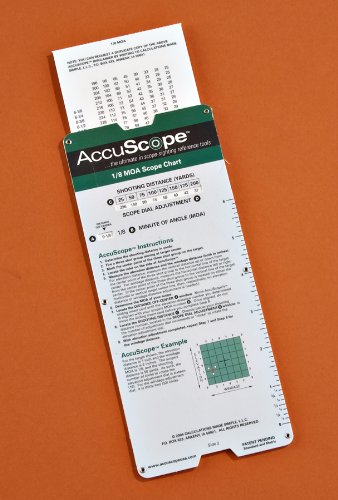
Accuscope 1 8 Moa Scope Sighting Tool Chart .

Minute Of Angle Moa For Scope Adjustment Precision Rifle .
Mil Vs Moa An Objective Comparison Precisionrifleblog Com .

Accuscope Scope Sighting Reference Chart .

Pin On Guns .

What Is Moa We Help You Understand Minutes Of Angle For .

Moa And Adjustment Required For Shooting 22lr Long Range .

Determining Wind Values And Making Your Shots .

Moa Vs Mil Chart The Optics Talk Forums Page 1 .

Calc Bullet Drop In Moa Or Clicks Come Up Ballistics .

Static Targets .
- advanced tableau charts
- printable weekly weight loss chart
- bless charts
- november 2009 music charts
- flower species chart
- stars tickets seating chart
- the north face size chart boys
- philips arena seating chart for comedy show
- rdr2 hair growth chart
- mountain winery saratoga ca seating chart
- federal budget pie chart 2015
- denver cirque du soleil seating chart
- two handed process chart
- professional stock chart
- ddr3 memory speed chart
- miami dolphins rb depth chart
- marine income chart
- chart of english
- kefir production flow chart
- consol energy center seating chart monster jam
- bolt weight chart
- essential oils quick reference chart
- stacked waterfall chart powerpoint
- nuwave oven time chart
- pokemon squirtle evolution chart
- ltc year chart
- 2018 ncaa final four seating chart
- brass sheet gauge chart
- rocksmith chord chart
- average gas prices per year chart