Moa Shooting Chart - Long Range Shooting Moa And Mils Explained

Long Range Shooting Moa And Mils Explained

What Is Moa We Help You Understand Minutes Of Angle For .

How To Calculate The Minute Adjustments Required To Make On .

Pin On Scope Settings .
Long Range Shooting Moa And Mils Explained .

Moa Master Target Ranging Chart Free Download Gun Warrior .

Moa Vs Mrad .

What Is Moa We Help You Understand Minutes Of Angle For .

How To Understand Minute Of Angle Moa Long Range .

Details About Moa Minute Of Angle Laminated Chart For Rifle Pistol Target Shooting .

What Is Moa We Help You Understand Minutes Of Angle For .

Moa Mil Conversion Chart Chart How To Plan References Page .

Mils Vs Moa Which Is The Best Long Range Language Gun .

How To Understand Minute Of Angle Moa Long Range .

Mils Vs Minutes Of Angle The Complete Guide Everyday Marksman .

Mils Vs Minutes Of Angle The Complete Guide Everyday Marksman .

Mil Moa Conversion Chart .

Pin On Armas .

308 Ballistics Charts Point Blank Range Hunting Loads .

What Is Moa We Help You Understand Minutes Of Angle For .

Details About Moa Minute Of Angle Laminated Chart For Rifle Pistol Target Shooting .

Moa For Dummies Rifle Scope Reviews Gun Mart .

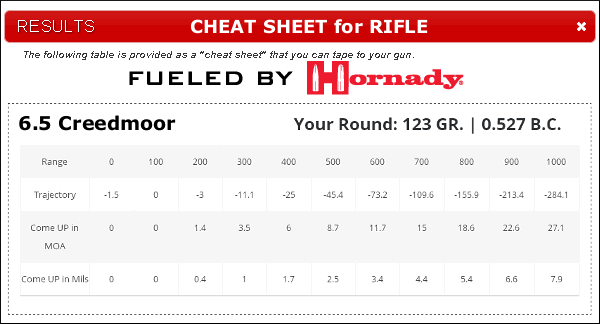
Print Handy Drop Chart With Free Hornady Ballistics .

Wind And Dope Charts And Getting Boned By Assumptions .

Ballistic Table Wikipedia .

Practical Long Range Rifle Shooting Part Ii Optics .

Long Range Shooting Moa And Mils Explained .

Pin On Rifle Dope .

Ballistic Table Wikipedia .

Mils Vs Moa Which Is The Best Long Range Language Gun .

Mil Vs Moa Understanding The Difference In Scope Measurements .

How To Read A Ballistics Chart .

Shooterscalculator Com 22 Lr High Velocity .

17 Studious Moa Bullet Drop Chart .

Moa Mils And Math The Long Range Shooting Guide Part 2 .

Millett Shooting Tips .

Understanding Minute Of Angle Moa Long Range Shooting Technique .

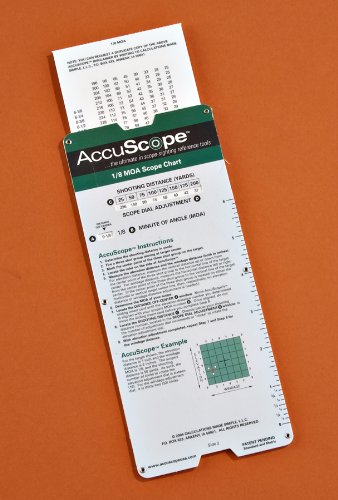
Accuscope 1 8 Moa Scope Sighting Tool Chart .

Minute Of Angle Moa For Scope Adjustment Precision Rifle .
Mil Vs Moa An Objective Comparison Precisionrifleblog Com .

Accuscope Scope Sighting Reference Chart .

Pin On Guns .

What Is Moa We Help You Understand Minutes Of Angle For .

Moa And Adjustment Required For Shooting 22lr Long Range .

Determining Wind Values And Making Your Shots .

Moa Vs Mil Chart The Optics Talk Forums Page 1 .

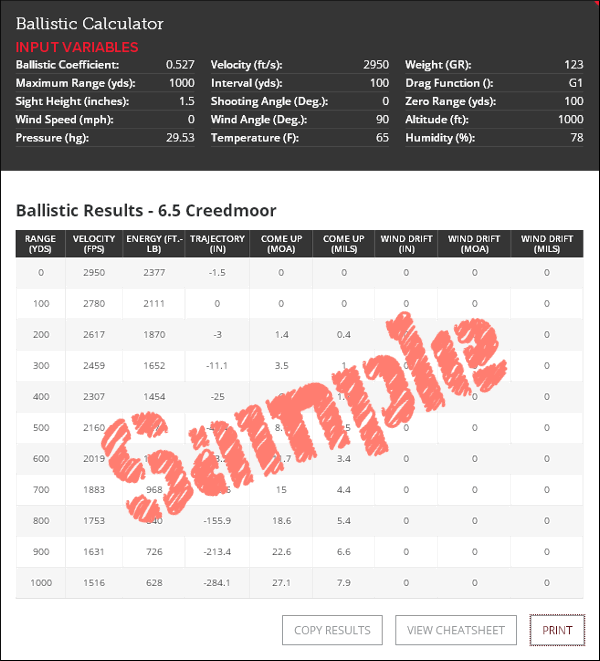
Calc Bullet Drop In Moa Or Clicks Come Up Ballistics .

Static Targets .
- smoothie king center seating chart for wwe raw
- olympic stadium montreal impact seating chart
- women's jiu jitsu gi size chart
- snellen chart amazon
- star chart wall art
- wooden chart holder
- silver coin weight chart
- wireless spectrum chart
- two hand process chart example
- small business org chart
- glycemic index food list chart for diabetes
- embraer turboprop seating chart
- minnesota depth chart
- sample nonprofit chart of accounts quickbooks
- jim chart
- seating chart peabody auditorium daytona beach
- festival theatre seating chart
- salt river grand ballroom seating chart
- vegetable chart with pictures and names
- whole foods stock price history chart
- wells fargo philly concert seating chart
- washington husky stadium seating chart
- cherokee tire size chart
- td bank boston seating chart
- wallingford oakdale theatre seating chart
- resch center seating chart wwe
- wood chart discount code
- round robin scheduling example with gantt chart
- die hard battery group size chart
- radon test levels chart