Bend Allowance Chart - Layout And Forming Part Two

Layout And Forming Part Two

Press Brake Bend Allowance Chart Sheet Metal Brake Press .
Layout And Forming Part Two .

Bend Deduction Charts .

Making Straight Line Bends Aircraft Metal Structure Repair .

Press Brake Bend Deduction Chart In 2019 Press Brake .

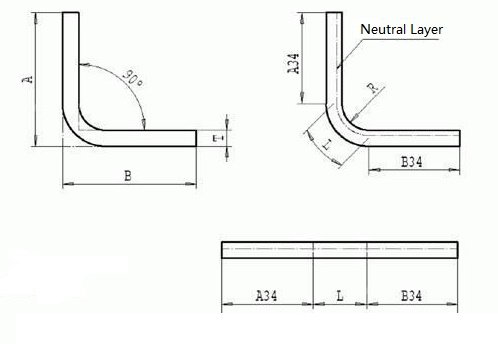
Ci Bend Allowance Chart Ae 103 Cincinnati Incorporated .

Layout And Forming Part Two .

Table A 17 Metal Bending And Bend Radii Bend Allowances .

Sheet Metal Calculator Bend Allowance Equations And .

K Factors Y Factors And Press Brake Bending Precision .

Bend Allowance Chart Fill Online Printable Fillable .

Sheetmetal Me Bend Allowance .

Ci Bend Allowance Chart Ae 103 Cincinnati Incorporated .

Sheet Metal Bend Allowance Calculator .

Bend Allowance Sheet Metal Part Design Solidworks Tutorial .

Minimum Versus Recommended Inside Bend Radius .

Sheet Metal Bend Allowance Calculator .

Solidworks Sheet Metal Tutorial Bend Allowance And Bend Tables .

Bend Allowance Calculator .

Calculating Bend Allowance Bend Deduction And K Factor .

105 Best Bending Technology Images Press Brake Press .

Online Calculator Of Sheet Metal Bend Deduction And Flat .

Press Brake Air Bending Tonnage Chart .

Sheet Metal Bending Design Tips Bend Allowance K Factor .

Sheetmetal Me Air Bend Force Chart Numbers .

Allowance Tables And Formulas .

Sheet Metal Bend Deduction Calculator .

Layout And Forming Part Two .

Bend Deduction Explained With Formula And Calculator .

Bend Deduction Table .

Sheet Metal Bending The Home Shop Machinist .
2018 Solidworks Help Bend Table .

The Difference Between K Factor Bend Allowance And Bend Deduction In Solidworks .

Details About Bendcalc Sheet Metal Bend Deduction And Allowance K Factor Tonnage Calculator .

K Factors Y Factors And Press Brake Bending Precision .

Layout And Forming Part One .

How To Drive Sheet Metal Parts Kb12121018 Driveworks .

Sheet Metal K Factor Bend Allowance And Flat Length .

Sheet Metal Bend Radius Chart Www Bedowntowndaytona Com .

Pin On Press Brake Tooling .

Pipe Bending Deduction Chart Bend Radius Chart .

Calculating Bend Allowance Bend Deduction And K Factor .

Minimum Versus Recommended Inside Bend Radius .

Stainless Steel Tube Bend Radius Chart Www .

What Is Bend Allowance .

Press Brake Shape Tonnage Chart .

Sheet Metal Design Guide Geomiq .

Bending Chart Tecnostamp Srl .
- top chart hits 2011
- type 2 diabetes blood sugar levels chart canada
- pokemon go egg chart december 2018
- chart instagram
- 224 ballistics chart
- rit score chart
- sea tide chart cape town
- imo organization chart
- cbc chart diagram
- online ore mineral chart
- ovulation chart boy girl
- coil zipper size chart
- government expenditures chart
- japanese time chart
- cor anglais finger chart
- titleist driver shaft chart 2015
- winchester supreme ballistic silvertip ballistics chart
- excise duty rate chart year wise
- steam charts call of duty advanced warfare
- farm bureau live seating chart with rows and seat numbers
- ford gear ratio chart
- forex line chart trading system
- bbt chart ovulation
- ssd iops chart
- 2011 dodge ram towing capacity chart
- scatter chart js
- fraction pie chart maker
- pregnancy test comparison chart
- earring gauge chart actual size
- fox launch pro knee pads size chart