Bend Allowance Chart - Layout And Forming Part One

Layout And Forming Part One

Press Brake Bend Allowance Chart Sheet Metal Brake Press .

Layout And Forming Part Two .

Bend Deduction Charts .

Making Straight Line Bends Aircraft Metal Structure Repair .

Press Brake Bend Deduction Chart In 2019 Press Brake .

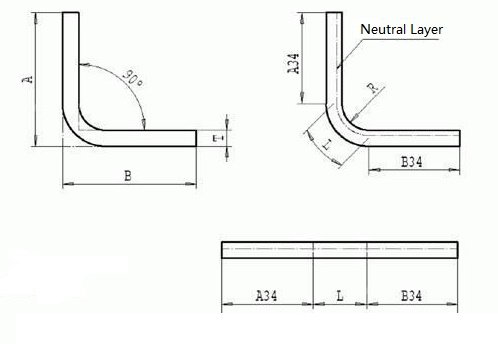
Ci Bend Allowance Chart Ae 103 Cincinnati Incorporated .

Layout And Forming Part Two .

Table A 17 Metal Bending And Bend Radii Bend Allowances .

Sheet Metal Calculator Bend Allowance Equations And .

K Factors Y Factors And Press Brake Bending Precision .

Bend Allowance Chart Fill Online Printable Fillable .

Sheetmetal Me Bend Allowance .

Ci Bend Allowance Chart Ae 103 Cincinnati Incorporated .

Sheet Metal Bend Allowance Calculator .

Bend Allowance Sheet Metal Part Design Solidworks Tutorial .

Minimum Versus Recommended Inside Bend Radius .

Sheet Metal Bend Allowance Calculator .

Solidworks Sheet Metal Tutorial Bend Allowance And Bend Tables .

Bend Allowance Calculator .

Calculating Bend Allowance Bend Deduction And K Factor .

105 Best Bending Technology Images Press Brake Press .

Online Calculator Of Sheet Metal Bend Deduction And Flat .

Press Brake Air Bending Tonnage Chart .

Sheet Metal Bending Design Tips Bend Allowance K Factor .

Sheetmetal Me Air Bend Force Chart Numbers .

Allowance Tables And Formulas .

Sheet Metal Bend Deduction Calculator .

Layout And Forming Part Two .

Bend Deduction Explained With Formula And Calculator .

Bend Deduction Table .

Sheet Metal Bending The Home Shop Machinist .
2018 Solidworks Help Bend Table .

The Difference Between K Factor Bend Allowance And Bend Deduction In Solidworks .

Details About Bendcalc Sheet Metal Bend Deduction And Allowance K Factor Tonnage Calculator .

K Factors Y Factors And Press Brake Bending Precision .
Layout And Forming Part One .

How To Drive Sheet Metal Parts Kb12121018 Driveworks .

Sheet Metal K Factor Bend Allowance And Flat Length .

Sheet Metal Bend Radius Chart Www Bedowntowndaytona Com .

Pin On Press Brake Tooling .

Pipe Bending Deduction Chart Bend Radius Chart .

Calculating Bend Allowance Bend Deduction And K Factor .

Minimum Versus Recommended Inside Bend Radius .

Stainless Steel Tube Bend Radius Chart Www .

What Is Bend Allowance .

Press Brake Shape Tonnage Chart .

Sheet Metal Design Guide Geomiq .

Bending Chart Tecnostamp Srl .
- gemini and taurus compatibility chart
- pocket watch size chart
- rashi letter chart
- hp bladesystem matrix compatibility chart 2017
- techno fruit color chart
- sensory analysis chart
- prime chart to 100
- honey viscosity chart
- tisco paint color chart
- polythene gauge chart
- piano practice chart for beginners
- how to make your own chart in excel
- carnegie music hall oakland pa seating chart
- kx 125 jetting chart
- rockport walk test results chart
- recorder notes and finger chart
- us dollar vs euro historical chart
- foetal development chart
- plus delta organization chart
- military guard pay chart 2018
- delta flight 1469 seating chart
- specialized sirrus bike size chart
- bud walton arena concert seating chart
- belmont basketball seating chart
- full vedic astrology chart
- gare underglaze color chart
- detailed astrology birth chart
- how to create waterfall chart in qlikview
- bullworker x5 exercise chart pdf
- usd streaming chart