Usf Acceptance Chart - Figure 4 Illustration Of Psf Grid And Usf Chart Imaging

Figure 4 Illustration Of Psf Grid And Usf Chart Imaging
:max_bytes(150000):strip_icc()/universitysouthfloridagpasatact-5bf4310a46e0fb00512681ea.jpg "Usf Acceptance Rate Sat Act Scores Gpa")
Usf Acceptance Rate Sat Act Scores Gpa .
:max_bytes(150000):strip_icc()/university-of-san-francisco-gpa-sat-act-57d699ad3df78c583368420a.jpg "University Of San Francisco Acceptance Rate Sat Act Scores")
University Of San Francisco Acceptance Rate Sat Act Scores .

University Of South Florida Main Campus Diversity Racial .
:max_bytes(150000):strip_icc()/universityofflorida-5bada8d2c9e77c0051ff8ee6.jpg "University Of Florida Acceptance Rate Sat Act Scores Gpa")
University Of Florida Acceptance Rate Sat Act Scores Gpa .

University Of South Florida Main Campus Graduation Rate .

Pin By Spencer Ward On Asfs University Of South Florida .

47 Exhaustive Usf Acceptance Chart .

University Of South Florida Main Campus Diversity Racial .

Systematic Sat Scores Chart Act Score Chart Percentile .
:max_bytes(150000):strip_icc()/GettyImages-833304420-e0b220c27c9e4ce7a21ba745a876db52.jpg "Usf Acceptance Rate Sat Act Scores Gpa")
Usf Acceptance Rate Sat Act Scores Gpa .

How Competitive Is The University Of Marylands Admissions .

These Are The In Demand Jobs In The Tampa Bay Region Wusf News .

University Of South Florida Main Campus Diversity Racial .

Usf Bioadvise .

University Of South Florida Main Campus Diversity Racial .
Figure 4 Illustration Of Psf Grid And Usf Chart Imaging .

First Year Students Orientation At Usfsp .

University Of South Florida Wikipedia .


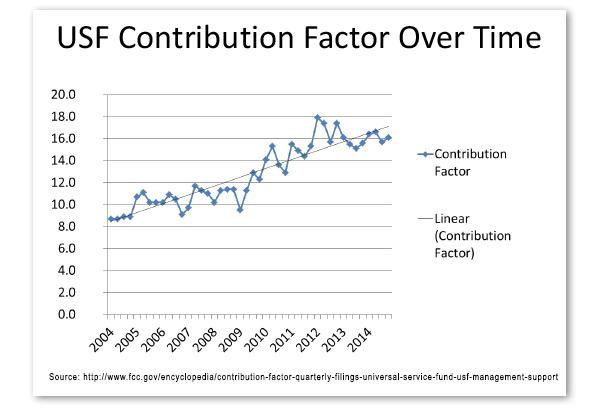
Disturbing Trend In Usf Spending Federal Communications .

Usf Health Bookstore Pop Up Usf Health .

A Stunning Decline The Crows Nest .

Usf Graduate Assistants Fight For Pay Health Care Coverage .

Referendum Results More Usf Students Are Against Fee To .

Organizational Chart Usf Sarasota Manatee .

Ecu Depth Chart Released For Usf Game .

Usf Moves Up The Chart In U S News And World Report Ranking .

2011 1015 Usf Uconn1 Fauria Tony Britts Spotter Charts .

A Stunning Decline The Crows Nest .

Usf Theatre 1 Tickets And Usf Theatre 1 Seating Chart Buy .

Usf Sundome Seating Chart Seating Chart .

Football Groups Usf Athletics Ticketing .

Facilities Management Organization Chart Myusf .

Hsc110 Funding Sources Chartfields Usf Health .

My Chart Usf Health .

South Florida Bulls Basketball Tickets At Usf Sun Dome On January 4 2020 At 2 00 Pm .

Fillable Online Etc Usf Number English Spanish 1 2 3 .

University Of South Florida Main Campus Diversity Racial .

Usf Sundome Seating Chart .

Usfcard Information Technology .

University Of South Florida Fast Chart Field Tips Ppt Download .

Usf Graduate Assistants Fight For Pay Health Care Coverage .

Study Florida Benefits When Undocumented Immigrants Get .

Usf Theatre 1 Tampa Fl Seating Chart Stage Theatre .

Nit Admission Process Flow Chart .

Usf Point Of Dispensing .

Fillable Online Usf Technology Transfer Oce Organiza Onal .

Usf Bulls South Florida Bulls .
- va benefits compensation chart
- tag heuer battery chart
- how to add chart title
- terminal chart
- spring charts demo download
- toro snow blower comparison chart
- seating chart camp randall stadium wi
- high heel chart
- std info chart
- purina horse feed comparison chart
- tabernacle atlanta ga seating chart
- women's carhartt jeans size chart
- china airlines mileage chart
- ufc seating chart msg
- urine test colour chart
- frank erwin center ufc seating chart
- raymond james seating chart kenny chesney
- solar energy chart
- project gantt chart online
- seating chart table cards
- vibram furoshiki sizing chart
- qqq 10 year chart
- unionbay size chart juniors
- levis sweater size chart
- whbm size chart
- t mobile vegas seating chart
- science diet perfect weight cat feeding chart
- motherboard performance chart
- wonderwink scrubs size chart
- small pocket charts for classroom