Ssc Chart - Data Interpretation Part 7

Data Interpretation Part 7

Latest Salary Chart Of Ssc Cgl Chsl Cpo Mts As Per .

Ssc Salary Chart After Seventh Pay Commission From 01 01 .

Career Chart For Ssc And Hsc Students .

Ssc Salary Chart 2019 Pay Band Allowances Perks Pay .

Latest Ssc Salary Chart After Seventh Pay Commission .

Ssc Salary Chart 2018 Cgl Mts Ldc Deo Je Pay Scale After .

Ssc Cgl Type Of Jobs Exam Info Weightage And Cutoff Marks .

Salary Chart For 125 Da .

Latest Salary Chart Of Ssc Cgl Chsl Cpo Mts As Per .

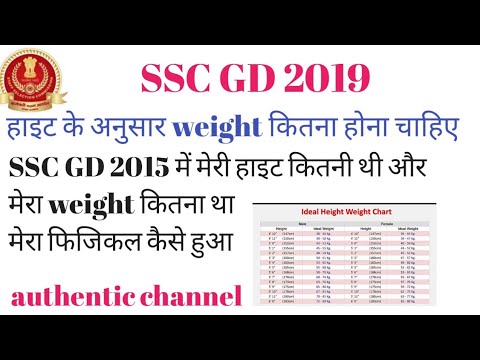
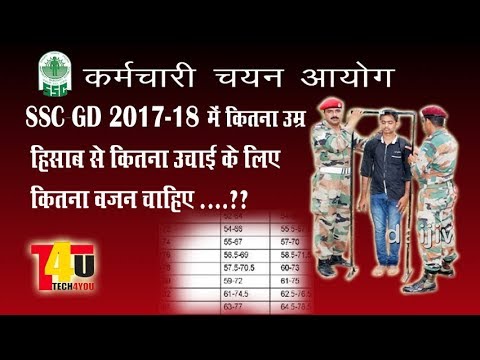
Ssc Cpo Physical Standard 2019 20 Pet Pst Criteria Height .

About Staff Selection Commission Ssc Ssc Portal Ssc .

Salary Chart For New Recruits Of Ssc 90 D A Sscibps Com .

Ssc Salary Chart 2019 Pay Band Allowances Perks Pay .

Flow Chart Of The Ssc Method Download Scientific Diagram .

Data Interpretation Questions For Ssc Cgl 2017 Sscadda .

How To Write Graph And Chart For Ssc Hsc 2019 Part 2 .


Letstute Mathematics Topicwise Chapterwise Charts For .

Ssc Combined Graduate Level Exam Ssc Cgl Pie Chart Online .

Exam Preparation Describing Graphs And Charts English 1st .

Ssc Hsc Graph Writing Graph Writing For Ssc And Hsc English 1st And 2nd Paper .

Letstute Ssc Maths Chart Book Class 10 Topicwise Chapterwise Mathematics Summary Formula Revision .

Complete The Following Chart Ssc English Medium Class .


Ssc Cgl 2018 Tier 2 Shift Wise Attendance Chart Rti .

Flow Chart For The Isolation Procedures Of Ssc Asc And Psc .

Ssc Cgl 2019 Ssc Cgl Notification Ssc Cgl Exam Date .

Strategy 60 Days Strategy For Ssc Cgl Tier I Exam Ssc .

Ssc Constable Gd Physical Standard 2020 Pet Pst Details .

Complete The Following Concept Chart Ssc English Medium .

Describing The Graph Of The Total Candidates In S S C .
Data Interpretation Part 7 .

Ssc Exam 2019 Special Suggestion Graph Chart .

Complete The Following Flow Chart Ssc Marathi Semi .

Pie Chart Formula And Examples With Explanation For Ssc And .

Space Saving Chart Ssc 370 Chart And Chart Projector .

Ssc Hsc Graph Writing Graph Writing For Ssc And Hsc English 1st And 2nd Paper .

Exam Preparation English First Paper Describing Graphs And .

Ssc Chsl 2016 Final Result Marks Cut Off Chart Result .

Ssc Shaw Afb Airport Skyvector .

Chapter Ssc Cgl Tier 1 Numerical Aptitude Pie Charts .

Ssc Cgl Salary Ssc Mts Salary Ssc Chsl Salary Ssc Kart .

Data Interpretation Part 9 .

Career After 10th What Next After 10th Class Ssc .

Ssc Gd Syllabus 2019 New Exam Pattern Download Ssc .

Ssc Coaching Centres In Chennai Ssc Cgl Coaching In Chennai .

Smartcool Systems Inc Tsxv Ssc V Seasonal Chart Equity Clock .

Ssc Cgl Salary Structure 2018 Check Out Pay Scale Job .
- megabyte gigabyte chart
- coaxial power plug size chart
- geogrid cross reference chart
- indira gandhi birth chart
- chart of accounts standard numbering system
- chart of immigration
- pipe gauges thickness charts
- steak and shake calorie chart
- wells fargo center seating chart center stage
- rife machine frequency chart
- hyperthyroidism tsh levels chart
- iowa state university organizational chart
- rib roast temp chart
- placental size chart
- ibanez serial number chart
- 747 8 intercontinental seating chart
- general organics feeding chart
- quarter horse color chart
- router throughput chart
- forex line chart trading system
- olympus tough comparison chart
- click charts free download
- fountas and pinnell alphabet linking chart color
- ral colour chart buy
- professor poopypants name chart
- scotiabank saddledome seating chart
- hurley size chart women's
- size 7 hat chart
- giant road bike frame size chart
- army reserve basic training pay chart