Mil To Moa Chart - Jeremy Author At Tactical Classroom Page 5 Of 6

Jeremy Author At Tactical Classroom Page 5 Of 6

Mils Vs Moa Which Is The Best Long Range Language Gun .

Mil Moa Conversion Chart .

Moa Mil Conversion Chart Chart How To Plan References Page .

Pin On Scope Settings .

Long Range Shooting Moa And Mils Explained .

Mils Vs Moa Which Is The Best Long Range Language Gun .

Mil Vs Moa An Objective Comparison Precisionrifleblog Com .

Milliradian Wikipedia .

File Ballistic Table For 7 62x51 Mm Nato Mil And Moa Png .

The Mil Dot Reticle Distance Chart Shooting Targets .

Mils Vs Minutes Of Angle The Complete Guide Everyday Marksman .

Both Mils And Moa Are An Angle They Were Intended To .
Jeremy Author At Tactical Classroom Page 5 Of 6 .

Moa Vs Mil Chart The Optics Talk Forums Page 1 .

Mil Vs Moa An Objective Comparison Precisionrifleblog Com .

File Ballistic Table For 7 62x51 Mm Nato Mil And Moa Png .

Why Moa Instead Of Iphy In The First Moa Reticles .

Long Range Shooting Moa And Mils Explained .

Easy Moa Mil Calculator Pro .

Moa Dope Cards Diagrams .

Mil To Micron Conversion Chart Mil Thickness Conversion .
Mil Vs Moa An Objective Comparison Precisionrifleblog Com .

Long Range Shooting Moa And Mils Explained .
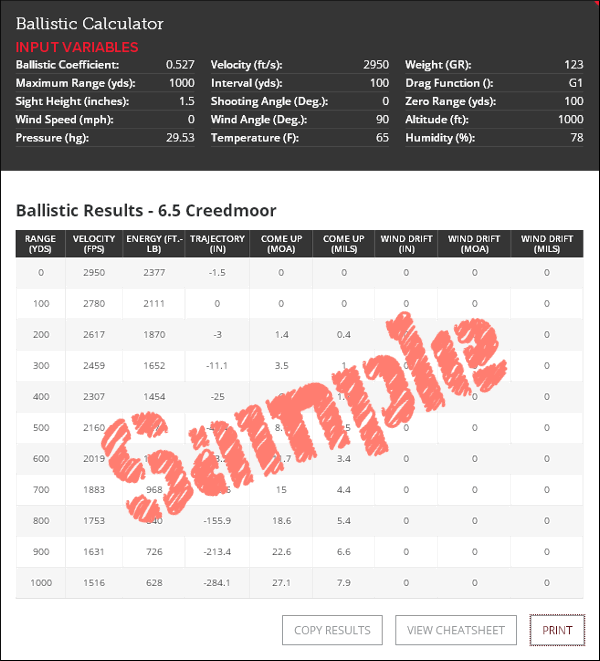

Free Ballistic Calculator .

Easy Moa Mil Calculator Pro For Android Free Download .

Mil Vs Moa Understanding The Difference In Scope Measurements .

Mil Vs Moa An Objective Comparison Precisionrifleblog Com .

Leupold Rx2800 .

Range Reference Chart Moa .

How To Calculate The Minute Adjustments Required To Make On .

Mil Dot Ballistics .

Long Range Mrad Shooting .

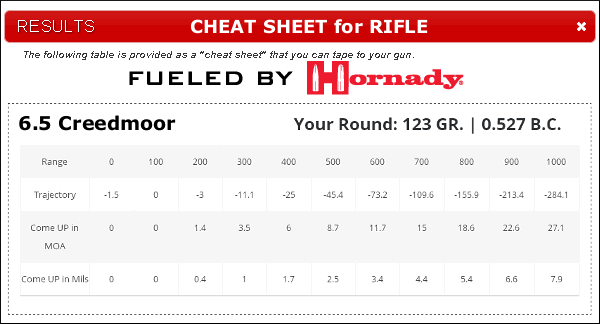
6 5 Creedmoor Ballistics Chart .

Mils Vs Moa Which Is The Best Long Range Language Gun .

Mils Vs Minutes Of Angle The Complete Guide Everyday Marksman .

Mil Versus Moa Ar15 Com .

Pellet Path Calculator Connecticut Custom Airguns .

Atn Laser Ballistics 1500 Smart Laser Rangefinder W .

Long Range Mrad Shooting .

Mil Vs Moa Whats Best For Hunting Beginners Long Range .

Mil R F1 Reticle .

Long Range Shooting Moa And Mils Explained .

Simple To Understand Moa Vs Mil Optics .

Leupold Rx2800 .

17 Studious Moa Bullet Drop Chart .

Mil Dot Ballistics .

Best Ballistic Calculator Apps Free And Paid Sniper Country .

10 Best Ballistic Calculator Apps Range 365 .
- rubies pet size chart
- propane price chart 2019
- chemical guys wax chart
- marchesa notte size chart
- emotional frequency chart
- fraze seating chart
- adidas shirt size chart
- pottery barn growth chart
- snellen e chart
- kamik size chart
- marine pft score chart
- marquis test kit chart
- color chart for mixing colors
- european shoe size chart kids
- dremel tool comparison chart
- hypoglycemia chart
- sugar content in fruit and vegetables chart
- gaap chart of accounts
- speech sounds development chart
- spine chart
- trenton thunder seating chart
- zodiac house chart
- tincaps seating chart
- chart of the nuclides poster
- clinique even better foundation shade chart
- partners chart
- percentage chart excel
- home appliance wattage chart
- lvl load chart
- how to do a pedigree chart