Load Chart Example - Step 5 Save The Chart So You Can Load It Later

Step 5 Save The Chart So You Can Load It Later

Load Chart .

How To Read A Load Chart Crane Load Charts How To Use A .

How To Read A Load Chart Crane Load Charts How To Use A .

How To Read A Load Chart Crane Load Charts How To Use A .

An Example For Tower Crane Load Chart Download Scientific .

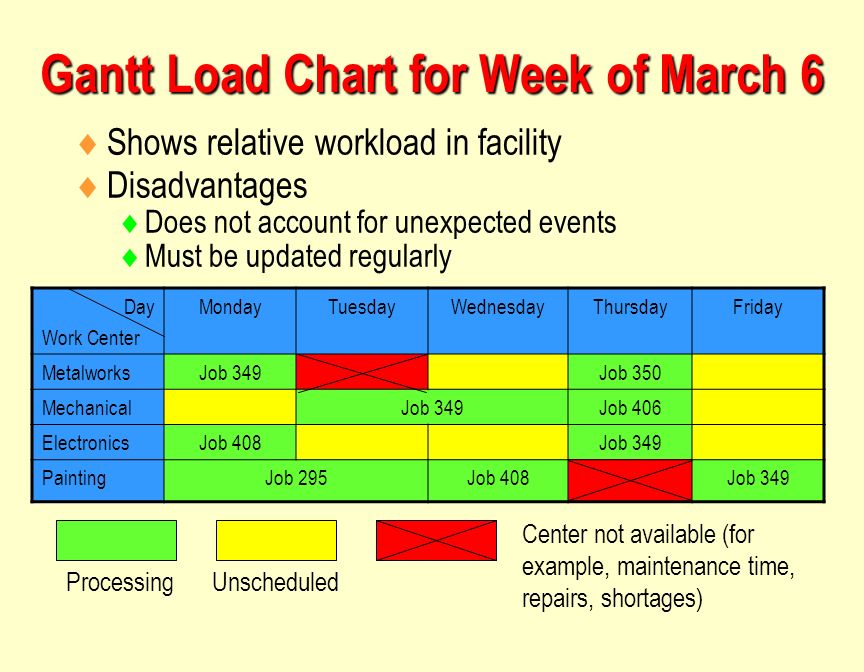
Schedule Chart .

Short Term Scheduling Ppt Download .

Charts For Planning And Scheduling .

Crane Load Chart Example .

Heizer 15 .

Gmk 6250 Load Chart Related Keywords Suggestions Gmk .

Short Term Scheduling Ppt Video Online Download .

Example Load Chart Generated By Simulator Using The .

Chart Examples .

How To Read A Load Chart Crane Load Charts How To Use A .

Example Of Using The Radial Tire Load And Inflation Pressure .

Server Cpu Load By Days Line Chart Example .

Block Diagramming .

Solved Make The Single Line Diagram And The Load Chart Fo .

Wpf Chart Load 500 Series X 500 Points Fast Native Chart .

Example Of Using The Radial Tire Load And Inflation Pressure .

Make The Single Line Diagram And The Load Chart Fo .

Codeactually Chart Api Examples .

Crane Lifting Load Chart Bedowntowndaytona Com .

Creating An Animated Bar Chart In Indesign Indesignsecrets .

Wpf Chart Load 1million Points Instantly Fast Native .

Help Monthly Cooling Load .

An Example For Tower Crane Load Chart Download Scientific .

Cooling And Heating Equations .

Visual Basic Net Tutorial 36 How To Use Chart Graph In Vb Net .

Laravel 5 Line Chart Example Code Using Google Charts Api .

Ngx Charts Cant Load Line Chart From Feed Correctly Works .

Example Invalidity Claim Chart .

How To Analyze Runners Training Load In Wko Using The .

Exhibit7 1 Layout Pdf Example 7 1 Process Layout Input .

Live Code Examples Powered By Codemirror Nvd3 .

Load Testing Metrics Explained Loadstorm .

Does Wind Speed Affect My Lift The Dothea Group .

Check Out Another Cool Interactive Network Graph Example .

How To Save Your Favorite Indicators On Tsupetot Com Chart .

Live Code Examples Powered By Codemirror Nvd3 .

Ece3300 Lecture 12b 9 Smith Chart Slotted Line Example .

Make The Single Line Diagram And The Load Chart Fo .

1 Predicting Tractive Performance Using Zoz Charts Example .

Training Load Example Charts All You Need To Know About .

Php Load Data From Google Analytics In A Chart Js Chart .
Step 5 Save The Chart So You Can Load It Later .

Comparison Chart Template 13 Free Sample Example Format .

Blast Resistant Glazing Design Journal Of Architectural .
- main idea details anchor chart
- barnstable harbor tide chart 2016
- stacked pyramid chart excel 2016
- red sox depth chart
- glp 1 agonist medications chart
- foo fighters fenway park seating chart
- electronic aviation charts
- wine chart
- political orientation chart
- couture bathing suit size chart
- idea stock chart
- 134a suction pressure chart
- microsoft excel column chart
- solar system chart for children
- point zero size chart
- shades of meaning anchor chart
- los angeles kings depth chart
- education chart
- power balance band size chart
- how to interpret vedic astrology chart
- toefl ibt score chart
- attractive excel charts
- even numbers chart 1 100
- gemstone prices per carat chart
- seating chart at the fox theater atlanta
- malawi cichlid compatibility chart
- chart birthstone
- intertraco crimping chart
- trailer weight chart
- how to read birth chart astrology