Hypotension Chart - Figure 1 From Abstention Or Intervention For Isolated

Figure 1 From Abstention Or Intervention For Isolated

Low Blood Pressure Hypotension Chart Causes Symptoms .

Low Bp Chart Usdchfchart Com .

Low Blood Pressure Chart For Women By Age For Men .

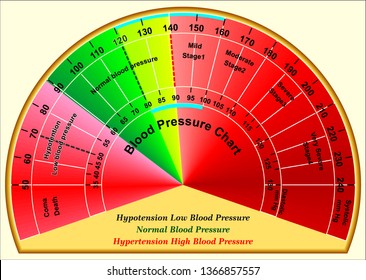
Blood Pressure Chart Download Scientific Diagram .

Understanding Blood Pressure Ultimate Bp By Age Chart .

Blood Pressure Chart Ranges Hypertension And More .

Blood Pressure Chart Ideal Blood Pressure Range Guide .

Hypotension Low Blood Pressure Causes Types Symptoms .

Pin On Rn .

Low And High Blood Pressure Chart Readings Health Center .

Yoga For Low Blood Pressure Hypotension Shannon Crow .

Pin On Heart Health .

Blood Pressure Readings Explained .

Chart Version Fentanyl In The Out Of Hospital Setting .

Hypertensive And Hypotensive Crises What You Should Know .

Hypotension Low Blood Pressure Facts And Causes Disabled .

Managing Hypotension Entresto Sacubitril Valsartan Tablets .

Evaluation And Management Of Orthostatic Hypotension .

Blood Pressure Disorders In The Neonate Hypotension And .

Bp Calculator .

Chart Version Fentanyl In The Out Of Hospital Setting .

Pediatric Vital Signs Reference Chart Pedscases .

A Convenient Chart For Showing Where The Normal Range Is For .

An Anesthesia Chart Of The Present Case Including The Event .

Figure 1 From Obstetric Spinal Hypotension Preoperative .

Hypotension Prediction Index Software For Management Of .

Anesthesia And Hypotension .
Figure 1 From Abstention Or Intervention For Isolated .

Maternal Hypotension During Fetoscopic Surgery Incidence .

Low Blood Pressure Hypotension Symptoms And Causes .

Low Bp Hypotension Diet Low Blood Pressure Foods 2 5 Apk .

Diet Chart For Low Blood Pressure Patient Low Blood .

Post Cardiac Arrest Care Acls Algorithms Com .

Hypotension Low Blood Pressure Facts And Causes Disabled .

Free Blood Pressure Chart And Printable Blood Pressure Log .

Postural Hypotension .

Evaluation And Management Of Orthostatic Hypotension .

Managing Hypotension Entresto Sacubitril Valsartan Tablets .

Chart Version Fentanyl In The Out Of Hospital Setting .

19 Best Low Blood Pressure Chart Charts Images In 2019 .

Frontiers Twenty Four Hour Non Invasive Ambulatory Blood .

Homeostatic Regulation Of The Vascular System Anatomy And .

Algorithm Showing The Therapeutic Approach To Patients With .

Health Concept Of Hypotension And High Cholesterol Blood .

Diagram Of Cardiac Output List Of Wiring Diagrams .

Free 9 Blood Chart Examples Samples In Pdf Examples .

High Blood Pressure Diet Chart In Tamil .

Tilt Table Testing .

Ppt Acetaminophen Associated Hypotension Powerpoint .
- bedtime chart for 2 year old
- cross stitch sampler charts
- prettyguide size chart
- lucid charts vs visio
- ohio medicaid income chart
- leviton decora color chart
- fuel filter crossover chart
- j crew jeans size chart
- reef safe fish chart
- haab charts
- uniform size chart
- jeppesen chart training dvd download
- caesars palace arena seating chart
- briteleafs compression size chart
- titleist 917 driver adjustment chart
- personal pronouns anchor chart
- ranger game seating chart
- pvc chemical resistance chart
- catalina plus size swimwear size chart
- high blood pressure levels chart
- epic electronic charting
- undercover size chart
- chrome hearts t shirt size chart
- carve designs swimwear size chart
- dermacolor camouflage cream shade chart
- bernardo shoes size chart
- home loan payment chart
- current 15 year mortgage rates chart
- lemon loves lime size chart
- girl scout brownie vest size chart