Bolt Head Chart - Keeping It All Together Part 1

Keeping It All Together Part 1

Bolt Head Markings Chart Zero Products Inc .

Bolt Head Markings Chart Zero Products Inc .

Screw And Bolt Head Types Identification Chart In 2019 .

Bolt Head Size Chart Use This Chart To Determine The Head .

Aircraft Bolt Identification Guide Table Engineers Edge .

Construction Bolt Head Identification Markings Guide .

Carbon Steel Hexagon Socket Head Bolt .

Screw Types Chart Google Search Screws Bolts Wood .

36 Types Of Screws And Screw Heads Ultimate Chart Guide .

Hex Bolt Dimensions Hex Cap Screw Dimension Chart .

Bolt Depot Bolt Grade Markings And Strength Chart Us Bolts .

Screws Selection Guide Engineering360 .

Pulley Bolts Sheared Off At 70 Mph Help Page 3 Harley .

Sae Bolts .

Screw Sizes Screw Sizing Chart Socket Cap Screw Data Asm .

Socket Head Cap Screw Basics Fasteners Bolts Screws And .

Formula For Nut Sizes And Wrench Sizes Cr4 Discussion Thread .

Fastener Type Chart Bolt Depot .

Bright Bolt And Wrench Size Chart Socket Dimensions Chart .

Machine Bolt Specifications Wellworx Co .

Heavy Hex Head Cap Screw Dimensions Atlanta Rod Atlanta .

Charts Products Ottery Cape Town Bolt It .

Bolt Depot Printable Fastener Tools .

Fast Spec Inc .

10 Easy Ways To Remove A Stripped Screw .

Model T Ford Forum Nut And Bolt Chart .

Fastener Basics .

Punctual Bolt And Wrench Size Chart Metric Measurements .

Hex Bolts Dimensions Table Din 933 Din 931 Size Chart .

Screw Dimensions .

70 72 Bolt Head Patterns Anyone Kept A Chart When You Did .

Socket Head Cap Screw Chart Socket Head Cap Screw Specs Din .

Bolt Depot Printable Fastener Tools .

Hex Heavy Hex Bolt Dimensions .

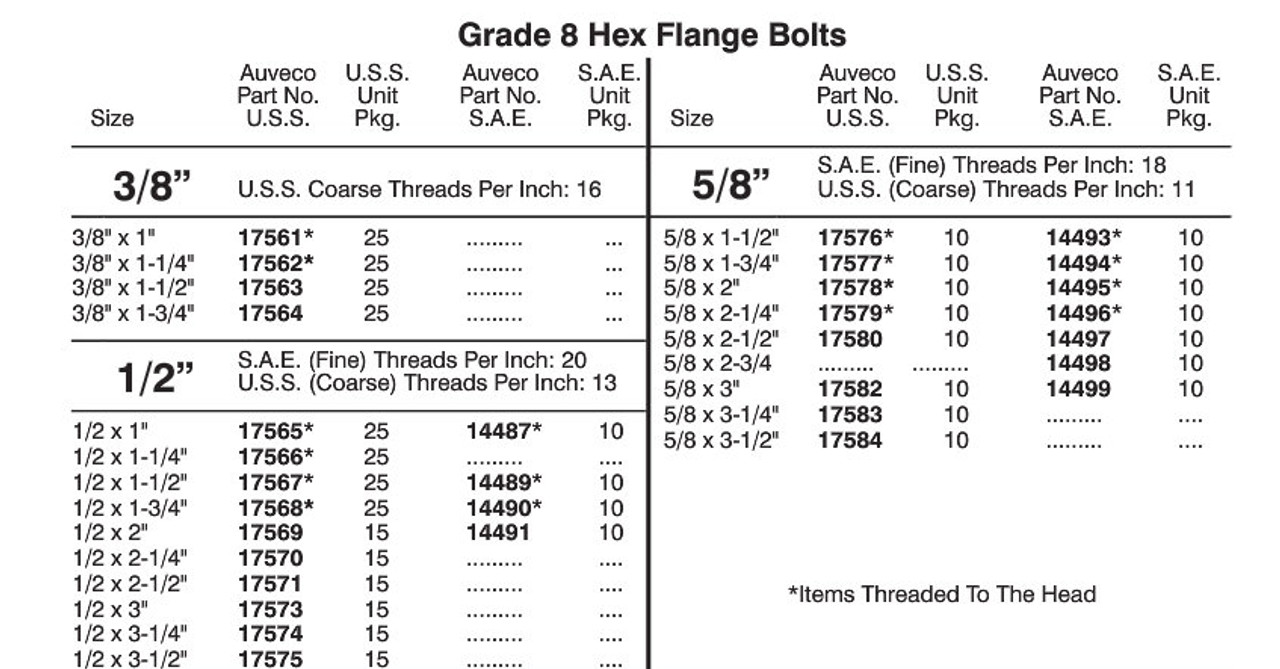
Flange Bolt Chart And Flange Stud Size In Mm .

The Classic Mechanic Mm Af Bsw Bsf Spanner Conversion Chart .

Blaser R8 Bolt Head Blaser R8 Bolt Heads Blaser Accessories .

13 Disclosed Machine Screws Size Chart .

Socket Flat Head Size .

Allen Din 912 Bolt Dimensions Valvias .
Keeping It All Together Part 1 .

General Description Of Stud Bolts And Hex Bolts Used In .

Bolts Selection Guide Engineering360 .

Model T Ford Forum Bolt Chart .

Cheat Guide Chart Bolts Screws Washers Nuts Drive Charts .

An Bolt Selector .

10 9 Grade Bolt Manufacturers Grade 10 9 Fasteners Grade .

Pan Head Wood Screw Sizes .
- rti flow chart template
- shar pei puppy growth chart
- blank incentive chart printable
- healthy waist size chart for women
- climateright cuddl duds size chart
- common metal density chart
- visual control chart in agile
- spanish imperative conjugation chart
- ted baker pants size chart
- my birth chart indian
- bitcoin amount chart
- vectra l1 flow chart
- george shirt size chart
- how to do a chart on google docs
- itunes chart uk top 10
- trove trading prices chart
- romania religion pie chart
- the billings method chart
- ford ranger colour chart
- commonwealth stadium seating chart with seat numbers
- rose bowl beyonce concert seating chart
- guitar hero 5 compatibility chart
- frank erwin center seating chart obama
- blank 100 chart to print
- canadian metric system chart
- graphics card chart 2017
- ak interactive color chart
- flight seating chart
- dra correlation chart
- handgun bullet caliber comparison chart